Introduction & Implementation of (RLS) in Power BI – Sisar
Row-level security (RLS) in Power BI enables you to control which users have access to which data. To restrict access to data at the row level, filters can be set within roles. Datasets in a workspace inside the Power BI service are accessible to members of the workspace. RLS places no limitations on this data.

RLS can be set up for data models that users have put into Power BI Desktop. Additionally, it may be set up for datasets that make use of Direct Query, like SQL Server.
Row-Level Security (RLS) is crucial since it makes it easier to design and code security into your application. RLS can be used to implement data row access limitations.
It mainly comprises of Static RLS and Dynamic RLS.
You will understand all about the advantages of dynamic row level security in power bi in this article. First, we must comprehend the fundamental distinction between Static RLS and Dynamic RLS.
According to static RLS, security logic must be specified inside of a Power BI file (PBIX), which must be opened, edited, saved, and then published once more for each update.
The definition of the security logic within the data model is known as “dynamic RLS” (tables, their relationships, etc.). To update the logic, you only need to add, amend, or delete records in the tables.
The following analogy can assist you in comprehending the differences between static and dynamic RLS:
| Static Row Level Security | Dynamic Row Level Security |
| Static RLS implies that you must open the PBIX file, make the necessary changes, save the file, and then publish the updated version of the Power BI file again. | The security logic is defined into the data model, which is known as “dynamic RLS” (tables, their relationships, etc.) To change the logic, simply add, modify, or delete records from the tables. |
| Static row-level security is straightforward to implement, but managing thousands of jobs would be a hassle. | Dynamic Row-Level Security is the solution in such instances. |
Requirements of Row-level Security
To implement Row-Level Security, we must perform each of the following procedures sequentially:
- List the people who will have access to the data. These users will be given access to some of the data based on the login context.
- The next stage is to create an integrated table-valued function in SQL. This function will keep the filter criteria for the table on which RLS is to be applied.
- As the last step, create a security policy for the table and use the aforementioned integrated table-valued function on it.
Instructions for installing Row-level security in Power BI Desktop

- In your Power BI Desktop report, you can either upload the data or create a DirectQuery connection.
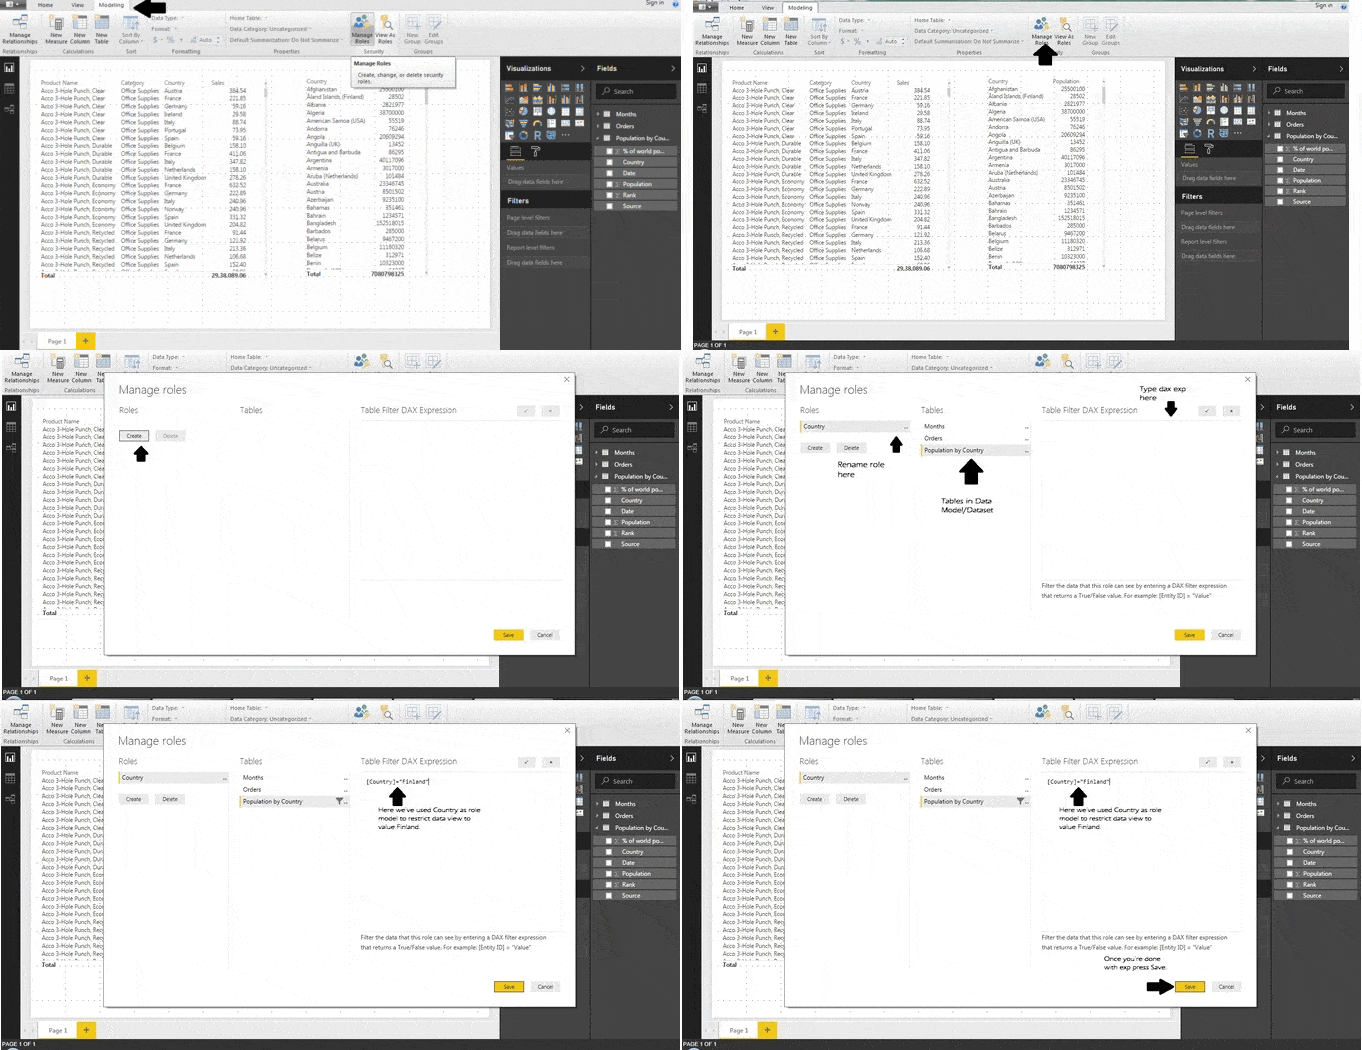
- To create row-level security, select Manage roles from the Modeling tab at the top of the page.
- From the Manage roles dialogue box that appears, choose Create.
- Following your selection of “construct,” a list of the data model’s tables will show up, from which you may select a filter to implement row-level security.
- You’ll see that a fresh DAX expression example will be added.
- The DAX expression should have the values replaced.
- Finally, create a role for a manager who wants to monitor the statistics.
Using Power BI Desktop to Validate the Roles

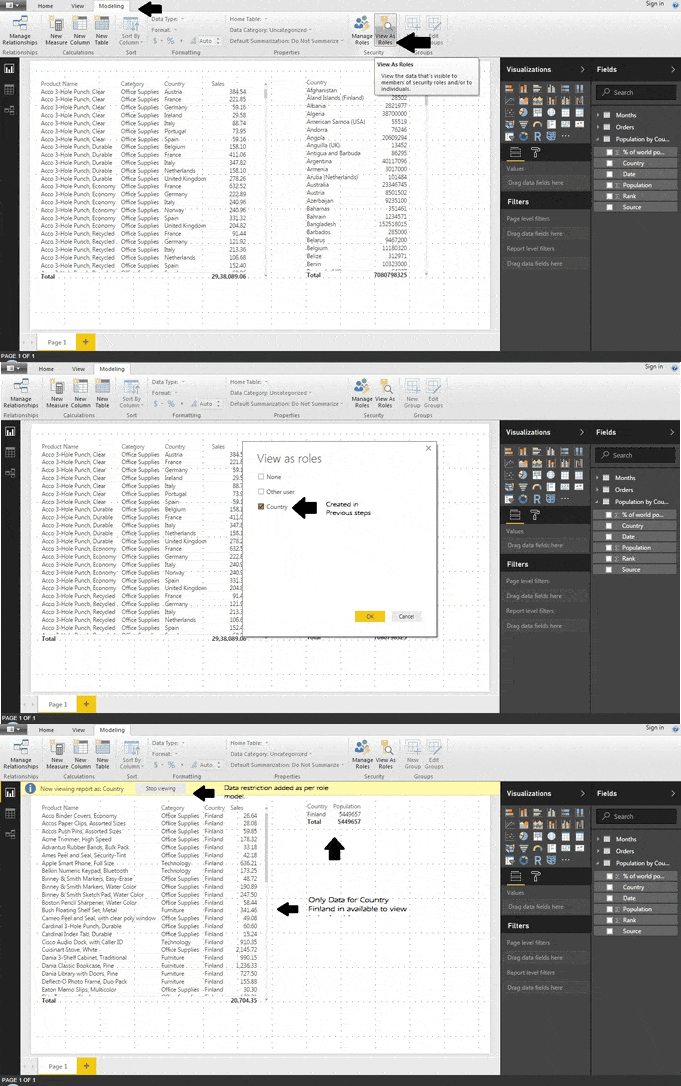
After creating your roles, test them out using Power BI Desktop to see how they work.
- Start by selecting View as Roles in the drop-down option.
- To use a role you created, choose it and click OK. The report makes the data suitable for that function.
- As an alternative, you can provide a different user and select them. It’s best to include the User Principal Name (UPN) because both the Power BI service and Power BI Report Server need it.
- After selecting OK, the report is prepared based on the user’s perspective.
When using dynamic security depending on your DAX expressions, other users often display different results in Power BI Desktop.
We will now go over the implementation of dynamic row-level security in detail with step-by-step instructions:
- Get the USER ID first from the Users table.
- Filter the user region table based on User ID after choosing Columns of Region ID from the Table Returned.
- Make a role that utilizes each of the determined Region IDs to filter the region table.
Following that, we’ll look at how tables and filters are used with dynamic row-level security:
- Users table – For Dynamic Row-Level Security to work, you’ll need a database of every user. All users must be included in this table, along with a field containing their Power BI report login id. Their login id is the email address they are logging in with if your report is hosted on the Power BI service. The login id is the network account used to access the server if the report is kept on the Power BI report server.
- Roles table – Roles table is also necessary. Remember that the data model’s definition of roles is dynamic. The roles database has a row for each access level. It’s important to remember that Roles don’t necessarily require their own table. You might also utilize your user table as a roles table. What circumstances might you ask? If each user just has one role, there is no need for a separate Roles table. A subset of your user table will be your roles table.
- The user table to filter roles table – If you anticipate that multiple users will be allocated to each position, you might filter the roles table from the user table using a one-to-many connection. On the other hand, the Users and Roles table frequently has a many-to-many relationship.
- Other tables filtered by the role table – The role table must filter the other tables in the data model. To filter data between Power BI tables, a relationship is used. You’ll need a relationship from the roles table that points in the right direction to the other tables in the data model.
- DAX filters – Another key element of dynamic RLS is the DAX expression that you develop in the capacity of a filter. This DAX expression is used to filter the USERS table in your model and extract the user’s login id. DAX expressions regularly employ the UserName(), UserPrincipalName(), and CustomData() functions to get user data.
Conclusion
This is a short overview of Row level security in Power BI. Microsoft Power BI is one of the potent security tools accessible for desktop and cloud services. Users can access various data views from the same Power BI material thanks to Row Level Security. Row level security implementation is straightforward, as you have learnt in this article. Because the DAX filter is implemented at the data row level, this method is known as ROW level security.


